Exchange Outlook 2011
Mac Outlook 2011
How to configure for Exchange
- Open Outlook
- Click on Tools, Accounts
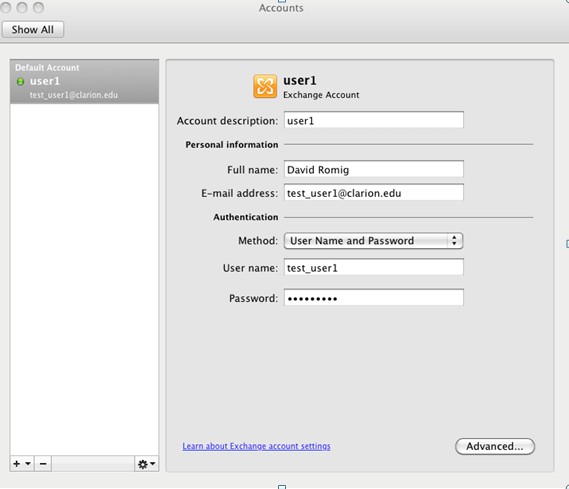
- Complete the following fields:
- Account Description: ["Claron E-Mail"]
- Full Name: [First and last name]
- E-Mail Address: [username@pennwest.edu]
- Method: **Should be set to "User name and Password"
- Enter 'User Name' and 'Password'
- Close Window
Contacts:
- How to import local contacts (contacts in your e-mail client) into Exchange
- How to import iClarion Portal contacts
E-Mails:
- How to send/receive e-mails
- To send an email message in Entourage:
- From the toolbar, click "Mail" button
- On the toolbar, click "New" button
(The address portion of the message appears) - In the 'To' text box, type the email address of the person you are sending the message to
HINTS:
If you are sending messages to multiple people, use a comma ( , )
to separate the email addresses. Pressing [tab] after you have entered
an email address in the To text box, will allow you to toggle between the
Cc and Bcc text boxes.
If you decide to remove a recipients email address, select the email
address that you wish to remove and click Remove button.
-
- Press [return] (The Message window appears)
- In the Subject text box, type an appropriate subject line
- Press [tab]
(The insertion point appears in the body of the message) - In the body of the message, type the appropriate text
- When you have finished typing, click "Send" button
(The message is sent)
- To receive new mail in Entourage: Entourage automatically checks for new mail every 10 minutes by default.
Calendar Features:
- How to access the calendar
- Open Entourage 2004 or Entourage 2008.
- Click the 'Calendar' icon on the left, top of the window,or click 'Calendar' in the folder list on the left.
- Select your Exchange calendar from the area on the left side of the window.
- Your Exchange calendar may be named Calendar [Your Name] - not Calendar [On My Computer].
- Your calendar is displayed.
- How to create an appointment:
- Open Entourage (2004/2008)
- Click 'Calendar' in the upper left corner of the window within the calendar, click the "New" button, or click File > New > Calendar Event
- In the Subject box, type a short description of the event
- In the Location box, type the location of the appointment or you may leave this box empty
- Select start and end times
- In the large, white box, you may add notes or details, or you may leave this box empty
- Click 'Save' to add this appointment to your calendar.
** Here are some helpful tips **
-
- To make it private in Entourage 2004, open an event and click Options > Private
- To make it private in Entourage 2008, open an event and click Event > Private
- Click the Invite button to convert the event into a meeting.
- Click All-day event to flag the entire day. For example, add "First Day of Classes" and make it an All-day event.
- Double-click on your calendar to create an event for that date and time.
- How to set calendar permissions - The following section provides instructions for granting other users access to your
Calendar and set permissions.
- From the Navigation pane, click Mail button
-
Press [control] and click the Calendar folder » select Sharing
-
(The Folder Properties: Calendar dialog box appears) -
Select the Permissions tab
-
Click ADD USER...
(The Select User dialog box appears)
-
In the text box, type the user name or list name with which you would like to share your Calendar -
Click FIND
-
From the scroll box, select the name(s) of users with which you would like to share your Calendar -
Click OK
(The name appears in the Folder Properties: Calendar dialog box) -
OPTIONAL: To add additional users, repeat steps 4-8
-
Under Name, select the name or group you have just added -
From the Permission Level pull-down list, select the appropriate choice
NOTE: Based on your selection, the default permissions for that level appear checked -
Select or deselect the specific permissions given for that level as appropriate
-
If you added more than one group or individual, assign their permission level by repeating steps 10-12 -
Click OK
- How to create an appointment
- How to import iClarion Portal Calendars